This guide will be universally applicable to any gas burner installation. Whether you want to mount it on a table or in the ground, for an in-ground fire pit. There are however some specifics I want to go over beforehand.
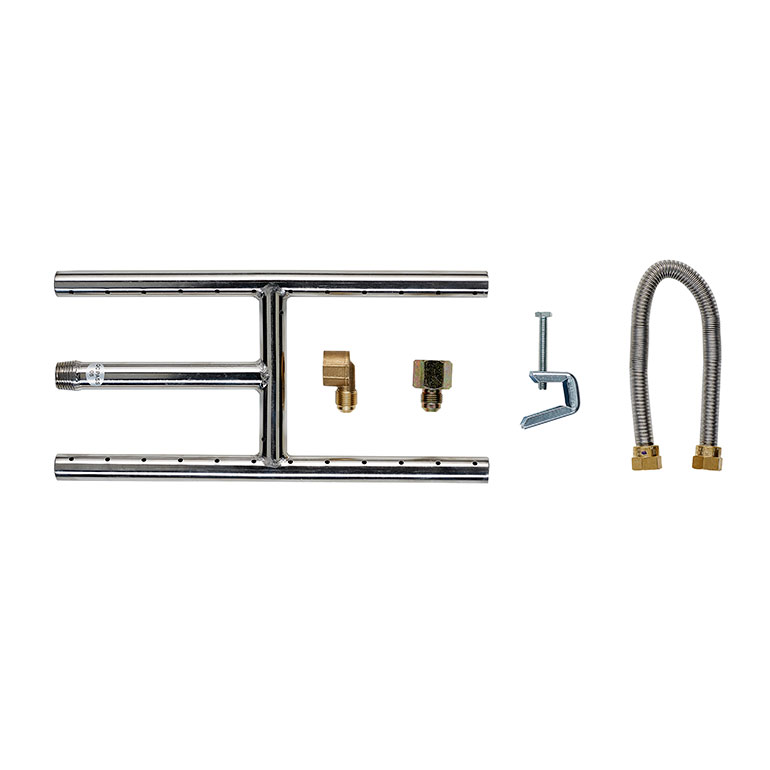
12 inch H-Burner Kit
Always have your gas pipe out of view and out of touch. This is both for visual appeal and for safety, you don’t want to hit it, walk on it or jerk it. Not to mention getting tampered with by children or animals.
If you build your fire table, always consider the fuel lines and integrate them into your design. It makes the whole installation safer and look a lot better than if the gas lines look like an after though.
Always close the gas from the main valve. Be it when you’re working on the burner, cleaning it or it happens to accidentally stop for whatever reason.
- 1). Turn off the gas at the valve
- Prep the space beforehand, remove any finishings, doors or screens. Clean the space from any dust or flammable compounds and even paint it with heat resistant paint if you don’t want it to get that aged fireplace look in the long term
- Install the flue damper c-clamp, this stops the flue closing while using the fireplace
- 2). Secure the gas pipe with channel locks and use a pipe wrench to remove the pipe cap
- Some pipe caps need to be heated with a torch before you can remove them
- 3). Apply pipe compound to the male gas line threads in your fireplace and then thread on the female to flared elbow adapter.
- Tighten with a wrench. The male end of the elbow should point to the back or corner, that’s where we attach the hose so we need it to be out of view as much as possible.
- 4). Apply pipe compound to the burners male threads and connect the female to flared adapter fitting and use a wrench to tighten it.
- 5). Connect the flex connector to the gas supply.
- Tighten with a wrench but do not use pipe compound here. Bend the hose in an S pattern carefully to not break it and in such a way that it bridges the gap between the gas supply and the H burners final position.
- 6). Connect the flex connector the H burner without applying any pipe compound and tighten it with 2 wrenches, one to keep the H burner secured and one to tighten the adaptor fitting.
- 7). Fix your H burner and hose in such a way that the hose is never over the burner or anywhere close to a flame and the burner should be at least 2 inches from the walls of its enclosure.
- 8). Check for leaks at this point to see if the adjustments loosened any of the threads or damaged the Flex connector.
- 9). Slowly turn the valve and light the gas escaping the H burner. And look for a smooth constant flame that stays easily lit.
- Add the appropriate amount of fire glass to get to burner covered and the tray filled.